By Chuck Schroeder, IMTS Media Representative/Owner – Insight Marketing
3D Scanning to Win There are dominant winning streaks, and then there’s KTM Motorsports’ string of 18 consecutive wins in the Dakar Rally 450 cc motorbike category. Formerly known as the Paris-Dakar (Senegal) Rally, KTM won this 15,000 km, 17-day race every year from 2001 to 2019. No wonder this Austrian-based company is Europe’s leading high-performance street and off-road sport motorcycle manufacturer.
To produce and continuously improve bikes such as the KTM 450 Rally (promoted with a slogan of “nothing hurts quite like second place”) or the new KTM 1290 Super Duke R (nicknamed “the beast” for its 1301 cc V-twin engine), KTM relies on metrology systems from Creaform, a worldwide leader in portable and automated 3D-measurement solutions.
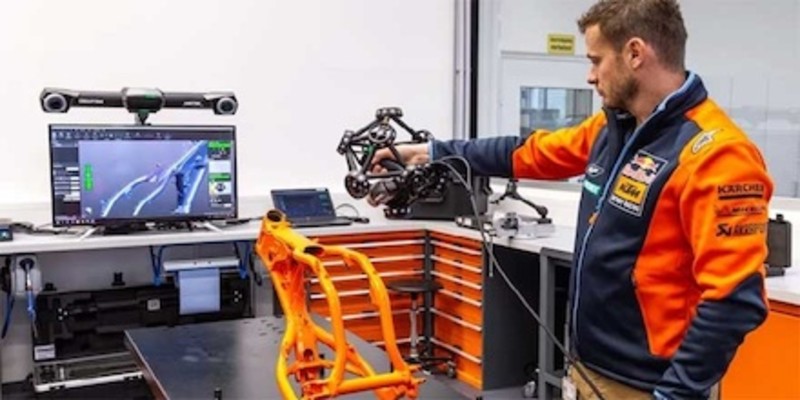
Instead of painfully slow physical measurement systems, KTM uses a pair of hand-held 3D-scanning systems that generate results within minutes, and that includes feeding information into its CAD software to compare “as-produced” results with the original design. Scanning looks about as complicated as using a paint gun, yet it revolutionizes metrology activities (view video).
Hand-held ScanningWinning races requires superior rider ergonomics and aerodynamics. The seat, steering bar, and pedals must be perfectly suited to the rider physiognomy, and the instrumentation must be adapted for optimal visual acuity. Therefore, to maximize the ergonomics, designers, and engineers must use measurement instruments that can scan the whole bike, including the driver. For this application, KTM uses Creaform’s Go!SCAN 3D, a hand-held, 2.7-lb. “white light” scanner.
White light scanning (or structured light scanning) combines a camera with a scanner and uses triangulation to make measurements. The device projects a series of parallel lines on the object, which become distorted by the object’s shape. The cameras capture the distortion from multiple angles to enable triangulating distances to points on the object. Software then assembles a point cloud that reconstructs the object’s size, depth, and curves. By connecting the scanner to a computer via the USB port, the technician can see results in near real-time.
White light scanning is the simplest, easiest, and fastest way to generate reliable measurements. The Go!SCAN 3D can provide an accuracy of up to 0.1 mm or 0.3 mm over a distance of 1.0 m, and the scan of the bike and rider takes about five minutes.
“We can make adjustments to components where we had not previously thought of doing so,” says Sebastian Witt, KTM’s Head of Quality Management Motorsport.
KTM also uses the MetraSCAN 3D optical CMM scanner. About the size and shape of soccer ball, this scanner uses seven laser crosses to scan with an accuracy of 0.030 mm, making highly accurate measurements possible in a production setting (note that it’s the greater number of optical elements that increases accuracy, not the inherent nature of the light source). By placing an optical reflector on the bike or component, the scanner creates a reference system “locked” to the part, so KTM can move the part anyway they want during measurement.
The cost of metrology-grade 3D scanners starts at about $35,000, but the paybacks are immediate, starting with the reduction in design iterations and associated material savings.
“The tolerances and materials we use are much more close to the limit and [they are getting to be] quite expensive,” explains Witt.
Materials cost aside, the ability to rapidly measure, adapt, and evolve product design. Performance is what keeps KTM at the head of the pack.
“For us, speed is also very important,” says Christian Schwartz, KTM’s Quality Controller Motorsports. “We need to put parts in the STL data [software data structures] and compare it easily with the CAD files.”
Such “scan-to-CAD” comparisons are further enhanced with “color mapping.” This process highlights deviations, geometry, and textures with different colors, enabling Schwartz to rapidly assess scan results at the track, in the production area or in the QC lab. Compared to using analog measurement systems, shifting to 3D scanners sounds like KTM has found the winning formula for quality control, first article inspection, and better aerodynamics.


